Showing posts with label Silhouette. Show all posts

Wednesday, October 9, 2013

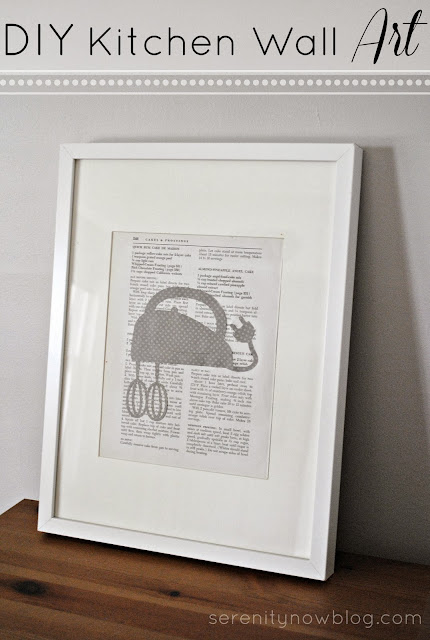
DIY Kitchen Wall Art (Vintage Cookbook and Silhouettes)

This post brought to you by Elmer's. I've had the idea for this post for ages, and I'm so excited to share it with you today. Using a few simple supplies, I put together some DIY Wall Art for my newly painted Kitchen. I love the look of silhouettes! Keep reading to see how you can create your own version.
DIY Kitchen Wall Art (Vintage Cookbook Pages and Silhouettes), from Serenity Now
Take a plain IKEA frame and a vintage cookbook and make some art! from Serenity Now


My friends at Elmer's sent me this awesome Craft It! kit filled with fun crafting supplies. It was so much fun to go through the box and choose items that would work for this project.
Elmer's Craft It! box of craft goodies! at Serenity Now


This is how I took a plain IKEA Ribba frame and an old cookbook and turned them into art. Please forgive the poor lighting in the photos...it has been extra cloudy here in Virginia!

Supplies:
DIY Kitchen Wall Art (Vintage Cookbook Pages and Silhouettes), from Serenity Now

-Frame(s)
-Old Cookbook (thrift stores are great for this)
-Pretty scrapbook paper
-X-ACTO Precision Cutting Scissors (not pictured)
-X-ACTO 12" Metal Ruler
-Silhouette Clip Art download to trace or "Crafty Cutter"

Directions:


DIY Kitchen Wall Art (Vintage Cookbook Pages and Silhouettes), from Serenity Now


1. Use your craft knife to carefully cut a cookbook page from the book. (You may need more than one if your pages are smaller than your frame)
2. Make sure your page lines up with your mat and grab the quick dry glue pen.
3. Use the precision tip of the glue pen to secure your page to the mat (not necessary, but I wanted it to stay put).

DIY Kitchen Wall Art (Vintage Cookbook Pages and Silhouettes), from Serenity Now

4. I used the adhesive dot runner to adhere the backing to the cookbook page for extra stability, but you can skip this step.

5. Take a peek at your framed piece to be sure it all lines up. It looks cute like this, but it needed something else!

6. If you're using a "crafty cutter," use your ruler to measure out the paper you've chosen.

7. Trace your shape with your cut out online clip art, or use your ruler to mark off the cut area for your paper to run through the crafty cutter.

DIY Kitchen Wall Art (Vintage Cookbook Pages and Silhouettes), from Serenity Now

8. Cut your shape using your X-ACTO scissors, or trim the paper to fit in your crafty cutter. Send your paper through the machine to create your silhouette shape.

9. Use the dual tip glue pen to adhere the shape to your cookbook page.

10. Double check your placement before adding the art and mat to the frame.

11. Voila! Completed project. Now repeat as needed.

I didn't like how the blender turned out, so I may replace it, but I love my other two silhouettes!

Our kitchen mini makeover is on its way!

DIY Kitchen Wall Art (Vintage Cookbook Pages and Silhouettes), from Serenity Now

DIY Kitchen Wall Art (Vintage Cookbook Pages and Silhouettes), from Serenity Now

Have you ever made any art work for your kitchen?

If you enjoyed this post or found it helpful, I hope you'll click your "Pin It" button to add this post to Pinterest, or a +1 for Google+. And I always appreciate kind comments.

Follow on Bloglovin


Disclaimer: This post is sponsored by Elmer's in exchange for product. It is not a financially compensated post. My opinions are, as always, my own.

Monday, January 14, 2013

Mini Snowflake Canvases (Silhouette Craft)

I know I'm not the only one around here wishing for a snow day! To celebrate wintery weather, I crafted up some cute Mini Snowflake Canvases, and I thought I'd post the tutorial here today. The cool thing about this one is that you don't have to have a Silhouette machine to do this craft (but it sure is handy)! Things can seem so bleary after all the Christmas decor is packed away...it's fun to have a little winter cheer to display.
Mini Snowflake Canvases (Silhouette Project) from Serenity Now

Mini Snowflake Canvases (Silhouette Project) from Serenity Now


Supplies:
Use Mini Canvases from the Dollar Spot to Make Winter Art! from Serenity Now

-3 Mini Canvases or Square Cuts of Wood (My canvases were $1 each from the Target Dollar Spot because they were craft kits)
-White Spray Paint or Craft Paint (My spray paint of choice is Krylon Dual because it's paint + primer in one)
-Blue Spray Paint or Craft Paint 
-Mod Podge, Small Sponge Brush, and Paper Plate
-Leftover Glitter Snowflake Ornament (You can find these in packs for like $0.10 after Christmas at Target)
-Hot Glue Gun
-Scissors

>>Optional Supplies<<
-Silhouette machine (I use the older SD model)

Directions:

Note: I'll be sharing directions using my Silhouette machine, but you could make your own stencils, or possibly even use stickers!

How to Make Mini Snowflake Canvases, from Serenity Now

1. Give your canvases a coat or two of white spray paint. Enough to cover any existing artwork. 

TIP: To give your vinyl/stickers the best chance of sticking to the painted canvas, let the paint dry overnight to "cure"!

2. Use your Silhouette to cut your wording out and apply the transfer tape. Cut close to the lettering to minimize the amount of tape that will touch the painted canvas.

3. Apply your lettering to the painted canvas. 

TIP: I used a pot scraper to firmly adhere the vinyl. It also helps to have something sturdy under the canvas to press against!

4. Apply a thin coat of Mod Podge to the letters. Brush on in upward strokes and then downwards as well. Let dry completely! This is to ensure your paint doesn't leak under the letters!

Mini Snowflake Canvases (Silhouette Project) from Serenity Now
5. Give the canvases a very light coat of the blue spray paint. Let dry completely (about 10 to 20 minutes for Krylon). 

6. Give the canvases another good coat of the blue, covering the canvases. Let dry completely.

Mini Snowflake Canvases (Silhouette Project) from Serenity Now

7. Using a pin or a tool, carefully peel your vinyl letters off. You can touch up any areas if desired.

8. Apply vinyl snowflakes.

9. Cover and seal with a coat of Mod Podge.

Mini Snowflake Canvases (Silhouette Project) from Serenity Now
 10. Heat up your hot glue gun and apply glue to the back of your snowflake.

11. Adhere the glitter snowflake ornament to the last canvas.

Voila!
Mini Snowflake Canvases (Silhouette Project) from Serenity Now

My canvases don't have a home yet, but I'm working on a little winter "mantel" for January.

Do you decorate for Winter in your home?

If you enjoyed this post or found it helpful, I hope you'll click your "Pin It" button to add this post to Pinterest, or a +1 for Google+. 

Monday, December 31, 2012

Best of Serenity Now from 2012

It only seems right to end 2012 by looking back at this blog and sharing some of the top posts and projects from the year. My accomplishments pale in comparison to most bloggers, but I'm proud of staying on top projects and consistently having a post up at the same time each morning. Some of these made the list because they received the most traffic, and some are posts that I liked enough to want to share again. I'd love to know which ones you enjoyed!
Best of Serenity Now blog, 2012


Thrifty Home Decor and Organizing Posts of 2012

Thrift Store Furniture Makeover from Serenity Now

IKEA Home Organizing Ideas, from Serenity Now


Soft Ginger Cookies
Soft Ginger Cookies, from Serenity Now

Nutella Peanut Butter Chocolate Croissants


Party Ideas from 2012

Hello Kitty Birthday Party
Hello Kitty Birthday Party on a Budget, from Serenity Now


Ballet Birthday Party on a Budget


DIY Cupcake Toppers
DIY Cupcake Toppers, from Serenity Now


Blogging Posts

Why Bloggers Need Community
The Perfect Blog (Comparison)


So, those were some of the most popular in 2012. I had a great year and had a chance to work with some amazing brands and bloggers. Hoping for more of the same in 2013!

Did you have a favorite post in 2012?

If you enjoyed this post or found it helpful, I hope you'll click your "Pin It" button to add this post to Pinterest, or a +1 for Google+.

Linking to Tatertots and JelloSouthern HospitalityPositively Splendid

Monday, November 19, 2012

Embellished Christmas Tree Shirt (Christmas Craft)

I don't often share Christmas projects or posts before the Thanksgiving holiday, but I got so excited about a big Silhouette Black Friday Promotion, that I decided to partner up with them and create a cute Christmas craft to show you guys. You can check in here on Friday morning for the big promo, but for today I hope you'll check out this Embellished Christmas Tree Shirt I made using the flocked heat transfer material. Only very basic sewing skills required (needle and thread).
Embellished Girls' Christmas Tree Shirt, from Serenity Now
DIY Christmas Tree Shirt (Silhouette Craft), from Serenity Now

Monday, August 13, 2012

DIY Business and Calling Card Tin Case

When I signed up to attend the Haven Conference back in June, I knew (from reading tons of conference recaps) that everyone would be trading business cards. I ordered some super cute cards, but I had nothing besides a ziploc bag to store them in. I knew that my cards would get lost in the caverns of my bag, so I cooked up a little DIY Business Card Case...also perfect for those cute little "mommy calling cards" that I've seen floating around.
DIY Business Card or Calling Card Tin, from Serenity Now

I was inspired by this cute one from my friend Shannon at Madigan Made!

Here's what you'll need to make your own:
DIY Business Card or Calling Card Tin, from Serenity Now

-Small (card-sized) tin
Mine was a Hello Kitty tin from Target's Dollar Spot!
-Spray paint
I used my favorite Krylon shade of Blue Ocean Breeze and a super fun shade of hot pink
-Painter's tape
-Silhouette SD/CAMEO machine, vinyl, and transfer tape (optional)

Instructions:
DIY Business Card or Calling Card Holder, from Serenity Now

1. Use the painters tape to mark off a border where the cover overlaps the lid (you don't want paint scraping off when you open and close the tin).
2. Spray paint your lid and the body of the tin in your chosen color(s).
3. Use your Silhouette machine to cut a fun monogram or design for the lid of your tin.
4. Adhere your vinyl to the lid using the transfer tape. 
Note: Let your paint "cure" overnight before adding the design. I added it the same day, and some of the paint peeled off when I removed the transfer tape. I touched it up by spraying some extra paint in the can lid and dabbing it on with a Q-tip. Waiting would have saved me that trouble.

And now you have a totally cute custom card holder!
DIY Business Card or Calling Card Case, from Serenity Now
DIY Business Card or Calling Card Tin, from Serenity Now

If you don't need business cards, consider ordering some fun "mommy calling cards." So much easier to pass out to new friends at the mall, park, or MOPS. Here are a few examples (I'm not affiliated with these, just did a Google search): zazzlevistaprint, and minted. Totally adorable, right?

How do you organize your cards or contacts?


Related Posts Plugin for WordPress, Blogger...