Showing posts with label A Season of Serenity series 2013. Show all posts

Monday, December 23, 2013

Seasoned Oyster Crackers Recipe (Christmas Recipe)

I've featured today's guest poster several times for her fab recipes and projects that she's shared at my weekly link party. She agreed to contribute to this year's Christmas inspiration series, A Season of Serenity!. Please welcome Amanda Jane Brown...she has a scrumptious holiday recipe to share with us!
*******************************

What an honor it is to be here with Amanda's readers here today at Serenity Now!

With the inevitable hustle-bustle of preparing for Christmas, spending time with family and friends, and crossing off our to-do lists, this series is such a wealth of great ideas for keeping things simple! I, for one, am always looking for easy, yet delicious recipes, especially during the Holiday season, when good food is expected, but time is limited! I am sharing one of our all-time favorite recipes today, Seasoned Oyster Crackers!
SeasonedOysterCrackersMain

They are packed with flavor and are so versatile...great as an appetizer or party food, delicious in soups and chili, or perfect for Christmas gifts for neighbors, teachers, or co-workers. And best of all, Seasoned Oyster Crackers are a snap to make! Enjoy!
             
Instructions:

Preheat oven to 275°.
3/4 cup canola oil
1 packet of dry Ranch dressing mix
1/2 t. dried dill
1/4 t. lemon pepper
1/4 t. garlic powder
1 pkg Oyster Crackers (next to Saltines at store)

In a large bowl, whisk together canola oil, dry Ranch dressing, dill, lemon pepper, and garlic powder. Add oyster crackers to the bowl and gently stir, coating well. Arrange crackers in a single layer on a cookie sheet.

  SeasonedOysterCrackersPan

Bake 15 minutes or until crackers begin to brown slightly. Remove pan from oven and transfer crackers to a paper towel-lined plate. Cool completely, then store in an air tight container.

      SeasonedOysterCrackers
                  SeasonedOysterCrackersMain

I'd love for you to stop by Amanda Jane Brown to say hi and to find many more recipes for your Holiday cooking and baking! Merry Christmas!

************************
I could gobble those up right now! Thanks for stopping by, Amanda!

*You'll find more holiday inspiration for this season at my Christmas series, A Season of Serenity, which is running all December long. The posts are rounded up as each one goes live. I'd love for you to visit!*


If you enjoyed this post or found it helpful, I hope you'll click your "Pin It" button to add this post to Pinterest, or a +1 for Google+. And I always appreciate kind comments.


Follow on Bloglovin

Thursday, December 19, 2013

Pom Pom Snowman (Christmas Craft for Kids)

It can be difficult to keep the little ones occupied during the holiday season. You want to get them involved in holiday activities, but you also have to make "grown-up" time to wrap gifts, run errands, bake, etc. Carolyn from Homework is here today as part of this month's holiday inspiration series (A Season of Serenity). She has a super cute Christmas craft that the kids can help with! Keep reading to see how she made this adorable Pom Pom Snowman!

*********************

Hello! Hello! I’m Carolyn from homework and I’m so happy to be over here at Serenity Now. Today I wanted to share with you a cute holiday craft that can be used for a variety of things. A little pom pom snowman.

To make a pom pom snowman, just make two pom poms, one slightly smaller than the other. If you’ve never made a yarn pom pom, it’s super easy.

Just wind yarn around your hand or a piece of cardboard several times. Slide the yarn off the cardboard or your hand and tie it tightly in the middle. Cut the looped ends on each side and fluff. Now get a pair of sharp scissors and start trimming into a ball shape.

Go slowly, trimming just a tiny bit at a time. Eventually you’ll have a nice fluffy pom pom. Stack the pom pom together with a dab of glue in between.


I made the hat and eyes out of black cardstock and the nose out of orange cardstock rolled into a tiny cone. The buttons are black sequins. You can use your pom pom snowman as an ornament or tie it onto a package to make someone’s gift extra special.

I hope you enjoyed my little holiday craft. Feel free to stop by and visit me over at homework anytime!
And thank you to Amanda for having me over today.
Signature Box 3

***********************

Thank you, Carolyn!

*You'll find more holiday inspiration for this season at my Christmas series, A Season of Serenity, which is running all December long. The posts are rounded up as each one goes live. I'd love for you to visit!*


If you enjoyed this post or found it helpful, I hope you'll click your "Pin It" button to add this post to Pinterest, or a +1 for Google+. And I always appreciate kind comments.


Follow on Bloglovin

Wednesday, December 18, 2013

Free Christmas Printable

I am so pleased to welcome sweet and talented Erin from How to Nest for Less to the blog today for today's latest edition of my Season of Serenity Christmas inspiration series. She has an adorable FREE Christmas printable to show off today. Printables are one of the easiest ways to update your holiday decor in a snap. Check it out...Erin's simple instructions to download and print are below.

                     merry christmas and happy new year

****************************

Hey everyone, it's Erin from How to Nest for Less. I'm thrilled to be filling in for Amanda today and sharing some Christmas cheer! erin how to nest for less

As a graphic designer, one of my favorite ways to decorate around the home is with printables! And I share a bunch on my site for every holiday.

Well today I have a new one just for the readers of Serenity Now!
merry christmas and happy new year

This is designed to be an 8×10 inch printable that you can cheaply frame or Mod Podge to a canvas board like I did for my Vintage Photo Prints or Back to School Boards.

Just right-click on the image above and save to your desktop. Then open, print and frame!
christmas free printable


And, if you're looking for another great holiday print, check out my Christmas Subway Art free printable. This is available to download by clicking here.
                                      christmas subway art free printable

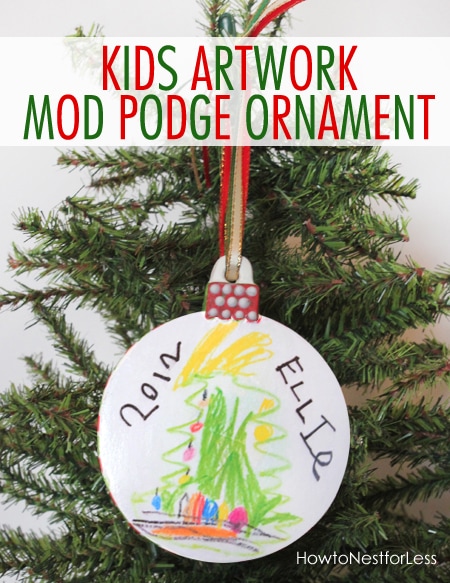
Also check out my tutorial on how to make an ornament from your kid's artwork for less than $5!
                          kids artwork christmas ornament

Thanks, Amanda, for letting me visit for the day and share my new printable. Happy holidays to everyone!

  ******************************

Wanna see how fast I can get to my printer? Seriously cute, Erin! Thanks for taking the time to create something special just for us.

*You'll find more holiday inspiration for this season at my Christmas series, A Season of Serenity, which is running all December long. The posts are rounded up as each one goes live. I'd love for you to visit!*


If you enjoyed this post or found it helpful, I hope you'll click your "Pin It" button to add this post to Pinterest, or a +1 for Google+. And I always appreciate kind comments.


Follow on Bloglovin

Tuesday, December 17, 2013

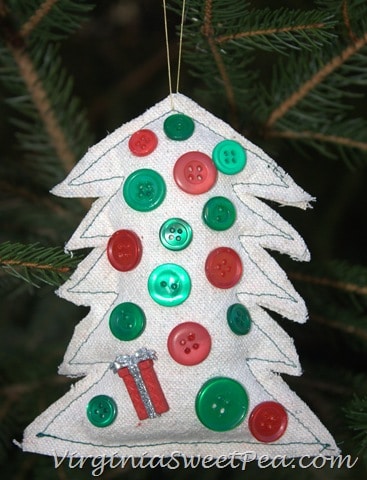
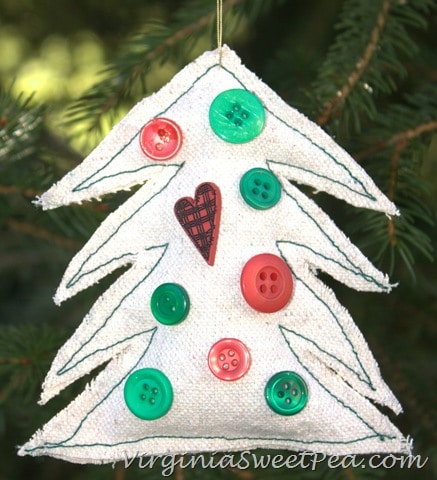
DIY Drop Cloth Ornaments (Christmas Craft)

I love handmade ornaments, and our family Christmas tree is a testament to that each year! As part of this month's Christmas series with lots of affordable, simple holiday ideas, Paula from Sweet Pea agreed to swing buy the blog today and share a fun tutorial for Drop Cloth Ornaments! Please help me welcome Paula.
**************************

Hello, Serenity Now readers, I’m Paula from Sweet Pea. I’m a 7th grade teacher by day and in my free time enjoy both blogging and being active. I love to run, bike, play tennis, and go to the gym. When I’m not teaching or sweating, I blog about DIY, crafting, decorating, cooking, gardening, and travel. I’m delighted to be Amanda’s guest today to share a fun Christmas craft:
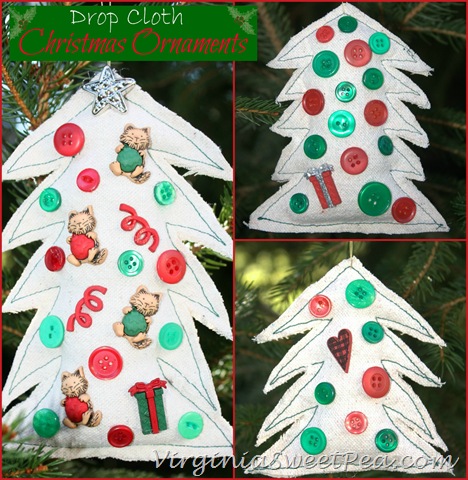
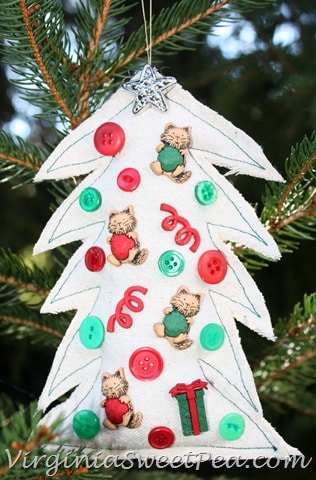
                                   Drop Cloth OrnamentsDrop Cloth Christmas Ornaments by virginiasweetpea Aren’t these cute? The great things is they are simple to make, too. Let me show you how.

Supplies Needed:

Drop Cloth Scraps
Thread
Needle
Scissors
Sewing Machine
Buttons
Fray Check
Craft Glue
Thin cord for hanging

Procedure:

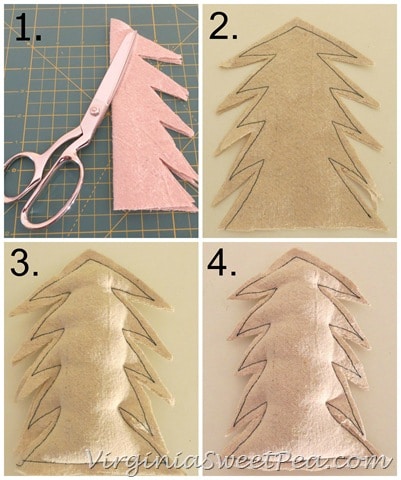
1. Fold a 5”x5” or smaller square of drop cloth in half. Cut limbs with scissors.

2. Stitch around the edge of the tree with contrasting thread with a 1/4” seam allowance leaving the bottom of the tree open.

3. Stuff tree with fiberfill stuffing. Sew the bottom of the tree closed.

4. Trim the edges of the tree so that both sides look uniform. How to Make Drop Cloth Ornament
5. Drop cloth ravels very easily. Run a bead of fray check around all edges and allow to dry.

6. Use craft glue to embellish the ornament with decorative buttons. I used Christmas buttons but any type would look nice.

7. Use a needle and thread to add a thin cord hanger to the ornament.

I had so much fun making these and can’t wait to give them to family and friends for Christmas.
Christmas Ornament for Amanda1 Christmas Ornament for Amanda3 Christmas Ornament for Amanda2a     

Many thanks to Amanda for inviting me to visit today. Amanda and I have both been blogging friends since we both began our blogs and hers is a daily must read for me. I’d love it if you would drop by to visit me at Sweet Pea or connect with me on Facebook, Pinterest, Google +, or Twitter. I hope you enjoy each and every day of this wonderful holiday season.

**************************
Love the rustic touch with the drop cloth, Paula! These would be perfect gifts and I know my kiddos would enjoy sorting through buttons to choose for our ornaments. Great idea!

*You'll find more holiday inspiration for this season at my Christmas series, A Season of Serenity, which is running all December long. The posts are rounded up as each one goes live. I'd love for you to visit!*


If you enjoyed this post or found it helpful, I hope you'll click your "Pin It" button to add this post to Pinterest, or a +1 for Google+. And I always appreciate kind comments.


Follow on Bloglovin

Wednesday, December 11, 2013

DIY Glitter Flats (Holiday Style)

Hello there! I hope you are enjoying this year's holiday inspiration series as I spend time with my family during this season (and my "maternity leave.") Today, we're welcoming the lovely Michaela Noelle back! I love her style; she is as beautiful inside as she is on the outside. Her tutorial for DIY Glitter Flats will have you running for your craft supplies! You'll be the envy of everyone at the next holiday gathering.


*****************************

Hello Serenity Now readers! I'm so thrilled to be here as apart of Amanda's holiday series. I'm Michaela, an interior designer, event stylist and DIY lover. While she's off spending precious time with her new baby and family for the holidays, I'm here showing you one way to save some moolah this season. 

Want to make some cute shoes for under $30?! Of course you do :) Here's the scoop...


When I used to live in Los Angeles, I took a trip to Rodeo Drive one afternoon. I quickly realized this wasn't the place for me to be shopping, as the most affordable store on the block was Juicy Couture.  We happened into Jimmy Choo, because, well, I'm obsessed with shoes, and I found this pair of black flats with glitter at the toe.  

Immediately, I knew I could recreate this pair of shoes for hundreds of dollars less. The next day I went to Target to buy a pair of simple black flats {$9.99} and Paper Source to pick up my spray adhesive and glitter {$9.99 & $3.75}.  Here's what you need and how to make your own:

Materials: flats, chunky glitter, super spray adhesive, blue tape, plastic bags {to cover the rest of the shoe when spraying the adhesive}.

Step One: Tape off the toe. Cover the rest of the shoe in a plastic bag so it doesn't get sticky.

Step Two: Spray a thick layer of spray adhesive on the tip of the shoe.

Step Three: Spread a heavy layer of glitter across the toe of the shoe on top of the adhesive. 

Step Four: Dump off the remaining glitter.  I used my fingers to gently rub over the tip of the shoe in order to get even more of the glitter off.  

shirt: J. Crew (no longer available) // pants: J. Crew // shoes: Target  

I have to say, I adore the look of my new shoes!  

Word to the wise-- wear them out a few times to get some of the excess glitter off before wearing them to people's homes and such :)  

What do you think? Is this a DIY you can do? While I love me some Jimmy Choo, I also love me a pair of shoes that is a fraction of the price. 

Hopefully this is a look you can recreate for holiday fashion!

Thanks for having me, Amanda!
xoxo
Photobucket

**************************

Pretty fabulous, huh? You all know I love glittery, shiny things, so these are right up my alley. Thank you so much, Michaela, for showing us this awesome project today!

*You'll find more holiday inspiration for this season at my Christmas series, A Season of Serenity, which is running all December long. The posts are rounded up as each one goes live. I'd love for you to visit!*


If you enjoyed this post or found it helpful, I hope you'll click your "Pin It" button to add this post to Pinterest, or a +1 for Google+. And I always appreciate kind comments.


Follow on Bloglovin

Tuesday, December 10, 2013

Paint and Glitter Dipped Pine Cone Cluster (Holiday Home Decor)

I'm welcoming Chaney from May Richer Fuller Be back as part of my ongoing Season of Serenity series. I couldn't wait to share this post with you all today. Such a classic and lovely addition to your holiday decor...a Paint and Glitter Dipped Pine Cone Cluster.

******************************


Hey y'all, I'm Chaney from May Richer Fuller Be. I'm thrilled to be a part of Amanda's awesome Christmas series this year! I've got an simple, inexpensive (it may even be free if you have all the materials on hand) decor idea for you today - a paint and glitter-dipped pine cone cluster. It would be perfect hanging in place of a wreath, hanging on the back of a dining chair, on a mantel...you name it! It's a great project to include kids on as well. Enough chatter though, let's get to it!

   
Supplies needed:
  • 5 large pine cones - store-bought or found
  • White paint
  • Gold glitter
  • Several yards of ribbon
  • Hot glue gun
  • Stapler
  • Scissors

To begin, I'd suggest putting down a couple of paper bags or newspaper on your work surface. Things are about to get messy! I also found that it helps to have a plastic bag or two handy to lay down the paint-dipped pine cones on - that way you don't have to worry about paper sticking to and messing up your pretty white paint.

Then, place all your supplies on your work surface. I poured some white latex paint into a disposable plastic bowl to make it easy for dipping. Go ahead and dip your pine cones (yes, you're literally going to dip your pine cones in paint!), rolling them around to cover the bottom half-ish in paint. It'll be drippy and messy and you'll wonder if you're doing it right, but let me assure you that you are. You can't mess this up! The messier the better.

Let some of the excess paint drip off back into the bowl and then lay them down on a plastic bag.


Grab your glitter. You only need a small amount for this project; in fact, I only needed about half of this tiny bag from a dollar store variety pack. Take a pinch between your fingers and sprinkle it lightly and evenly onto the wet paint. The method is similar to sprinkling salt when you're cooking. If you really like glitter, feel free to go heavier with it. I just prefer a light sprinkle :).
Allow the paint and glitter-dipped pine cones to dry overnight. The next day, you'll put them together in a cluster so they can hang.

Since it is Christmastime and all, I used some dark green grosgrain ribbon I had to string them together. Don't worry too much about the lengths - just don't make them too short! You'll likely have to trim them later once you get the pine cones positioned right. I used the thinner-width ribbon to attach to the pine cones, and the larger-width to make a big ole bow for the top.


Hot glue a piece of ribbon to each pine cone top. 


Once each pine cone has a ribbon, lay them out on the table to get an idea of how you'd like them to hang.


Then gather all the ribbons together and staple them together at the top to keep them together. 
Trim off the excess ribbon on the ends.

The next part is a little bit trick to explain in words, but the gist is that you want to tie a large bow around the stapled part of the ribbons.

The way I did it was to tie a long piece of ribbon into a bow first, then tie another short piece of ribbon around the bow's knot and the stapled area to secure the bow to the stapled area. Tie that into a tight knot to hold everything together. You may need to read those instructions twice, sorry! Let me know if you want more clarification on that.

In the end, you'll end up with something like this!

The pine cones look like they were dipped in fresh snow - especially with a hint of shimmery glitter. They're a perfect touch of winter for your home without actually bringing winter into your home, ha! You can rest the bow on a nail (that's what I did above), or wiggle the backside of the bow onto a hook. It would also be easy to safety pin it onto some fabric. Lots of possibilities!

Hope you enjoyed this little project. If you have any questions, be sure to leave a comment and I'll  be sure to stop by and answer. Thanks again to Amanda for asking me to be a part of this series!

***********************

Too much cute, right? Thanks for stopping by, Chaney!

*You'll find more holiday inspiration for this season at my Christmas series, A Season of Serenity, which is running all December long. The posts are rounded up as each one goes live. I'd love for you to visit!*


If you enjoyed this post or found it helpful, I hope you'll click your "Pin It" button to add this post to Pinterest, or a +1 for Google+. And I always appreciate kind comments.


Follow on Bloglovin
Related Posts Plugin for WordPress, Blogger...