Showing posts with label Simple Sewing. Show all posts

Tuesday, September 9, 2014

DIY Chalkboard Instagram Photo Display

This post brought to you by Martha Stewart Crafts® and Plaid.// I'm easing back into creative blogging after taking an extended maternity leave, and I am so excited to show off today's post, a DIY Chalkboard Instagram Photo Display, made with Chalkboard Paint and other items from the new line at Martha Stewart Crafts®. What do you get when you mix a thrifted cabinet door, some instagram prints, and some super-fun chalkboard paint?
DIY Chalkboard Instagram Photo Display from Serenity Now! #plaidcrafts and #marthastewartcrafts


DIY Chalkboard Instagram Photo Display from Serenity Now! #plaidcrafts and #marthastewartcrafts

I don't know about you, but I seem to take more photos with my phone than my Nikon lately. I don't want all those special moments living forever on my phone screen, so I decided to come up with a way to display our family memories where we can all enjoy them.

Don't have an Instagram account? Don't worry, I'll give you some more ideas for this display at the end of the post!

I decided to do my best to use thrifted items and things I had on hand for this project, so I hit up my local Habitat for Humanity ReStore to browse their cabinet door selection. They had plenty to choose from. I wanted a sizeable display, so I selected a large oak cabinet door for around $10, because I wasn't sure how the laminate would work with the chalkboard paint layered over spray paint.

Here are the supplies you will need:

DIY Chalkboard Instagram Photo Display from Serenity Now! #plaidcrafts and #marthastewartcrafts

1. Martha Stewart Crafts ® Laser-Cut Stencils
2. Martha Stewart Crafts® MultiSurface Chalkboard Paint
3. Martha Stewart Crafts ® 2oz Erasable Liquid Chalk
4. Craft paint brush (or see #6)
5. Assortment of coordinating fabrics (optional)
6. Martha Stewart Crafts ® pouncers--these are better if you're using small stencils
7. Baker's twine, string, ribbon, or plain twine
8. Pencil
9. Printed instagram photos (this is how I print mine)
10. Staple gun
11. Scissors
Not Pictured: Sand paper or palm sander, spray paint in your color choice, mini clothes pins, hot glue gun or needle and thread for fabric rosettes (optional)

How to Make Your Own Chalkboard Instagram Display:

1. Prep
Sand, Clean, Paint

I started with my plain old cabinet door. You know, the one with lovely white paint drips down the front. After removing the hardware, I took it outside and sanded it down in about five minutes with a palm sander. I also made sure to clean it off well before spraying. It took me several coats of spray paint to cover up the oak. I figured that some of the grain would continue to show through, but wasn't too concerned because the photos would cover most of it.
DIY Chalkboard Instagram Photo Display from Serenity Now! #plaidcrafts and #marthastewartcrafts

2. Stencil
Secure, Paint, Dry, Cure Time

After choosing which of the stencils I wanted to use and deciding on a layout, I secured my stencil using stencil tape from my craft stash (Martha Stewart Crafts® brand). I added my chalkboard paint to a paper plate palette, and used plain craft sponge brushes to brush the paint on.

I did one light coat, let it dry for one hour, and then added a slightly thicker coat. After that dried, I moved the stencil to paint the next portion of the cabinet door. When the pennant shapes were dry, I grabbed another stencil sheet and added polka dots in black and pink chalkboard paint for some extra pattern.

It's important to let the chalkboard paint cure for 24 hours before writing or stenciling on it with chalk. 
DIY Chalkboard Instagram Photo Display from Serenity Now! #plaidcrafts and #marthastewartcrafts

I loved the effect! Pennant banners are so much fun--Martha's team is great at choosing fun and trendy patterns and shapes for their stencils.
DIY Chalkboard Instagram Photo Display from Serenity Now! #plaidcrafts and #marthastewartcrafts

3. Creating a System for Hanging Photos
Decide on amount of photos, secure twine, clip on mini clothespins, add photos

I took a stack of my photos and moved them back and forth across the board until I found a grid that worked for me. I used a pencil, post-it notes, and a level to mark off the lines where I wanted my twine to go. I was lucky enough to find this pretty turquoise and white baker's twine in my craft stash, but you can find it in most craft stores or even the Dollar Spot.

My grid ended up with space for twenty photos, which is a great amount!
DIY Chalkboard Instagram Photo Display from Serenity Now! #plaidcrafts and #marthastewartcrafts

I used a staple gun to attach the twine to the back of the cabinet door, pulling the twine taut (without snapping it). I also left a bit of twine on each end to make a knot, so no twine would slip under the staples. This is where having a nice, thick oak door came in handy. No staples going through the wood!
DIY Chalkboard Instagram Photo Display from Serenity Now! #plaidcrafts and #marthastewartcrafts

4. Fabric Rosettes (Optional)
Use scissors, a hot glue gun, or a needle and thread to craft some rosettes as an embellishment for your display. Hot glue onto the frame of your display board as embellishment


DIY Chalkboard Instagram Photo Display from Serenity Now! #plaidcrafts and #marthastewartcrafts

There is absolutely no rhyme or reason to any of the rosettes I made. I just twisted, braided, and pressed the fabric until I found a shape I liked. I ended up using hot glue for these guys, with the exception of the one with the button embellishments...I folded that one back and forth and sewed through the center to keep it in place!
DIY Chalkboard Instagram Photo Display from Serenity Now! #plaidcrafts and #marthastewartcrafts

I used my trusty got glue gun to adhere the rosettes onto the frame in a pattern that I thought looked cute.
DIY Chalkboard Instagram Photo Display from Serenity Now! #plaidcrafts and #marthastewartcrafts

5. Use your chalkboard!
Stencil or hand-write something onto your pennant banner with your Martha Stewart Crafts® Liquid Chalk. I thought about using another shape to stencil inside the banner, but decided on lettering. 

You'll need to "season" your chalkboard with a piece of a chalk before you can write on it. I rubbed a piece of chalk over it and then erased.
DIY Chalkboard Instagram Photo Display from Serenity Now! #plaidcrafts and #marthastewartcrafts

Other words: Inspire, Fall, Autumn, Summer, Spring, Winter, Grace, Smile, Inspire, Create
Other ideas for the board: recipes, 4 x 6 photos, favorite quotes or verses on small cards, postcards, baseball cards, business cards

Voila!
DIY Chalkboard Instagram Photo Display from Serenity Now! #plaidcrafts and #marthastewartcrafts

DIY Chalkboard Instagram Photo Display from Serenity Now! #plaidcrafts and #marthastewartcrafts

DIY Chalkboard Instagram Photo Display from Serenity Now! #plaidcrafts and #marthastewartcrafts

What I love about the new line of chalkboard paint is how easy it is to work with! The finish goes on smoothly, and the dry/cure time is true to the advertisement. My only wish would be that it might come in the "Martha blue," which is my fave! The liquid chalk goes on smoothly, doesn't smudge...and it erases with water!

Are you loving this medium too? You can find the Martha Stewart Crafts® Chalkboard Paint line at Michaels craft stores. They also have a new line of Martha Stewart Crafts® Vintage Decor Paint!

If you're interested in learning more about Martha's chalkboard paint, you can watch this brief intro video from the folks at Plaid:

 What would you write on your chalkboard display?

If you enjoyed this post or found it helpful, I hope you'll click your "Pin It" button to add this post to Pinterest, or a +1 for Google+. And I always appreciate kind comments.

Want to connect with the Martha Stewart Crafts or Plaid team?

● Plaid Website: http://www.plaidonline.com/  
● The Plaid Palette Blog: http://www.plaidonline.com/blog - The Plaid Palette is a source of inspiration with news about new product introductions, project ideas, tutorials from Plaid’s craft experts and giveaways.
● Newsletter: https://www.plaidonline.com/craftnewslettersignup.aspx - Sign up for Plaid’s email newsletter for special coupons, project ideas and more!
● YouTube: http://www.youtube.com/plaidcrafts - Plaid’s YouTube channel features videos with product demonstration, special seasonal projects and ideas from top Craft Experts.
● Pinterest: http://www.pinterest.com/plaidcrafts 
● Facebook: https://www.facebook.com/InspiredByPlaid 
● Instagram: http://instagram.com/plaidcrafts - A look into daily life at Plaid and project inspiration.
● Twitter: http://www.twitter.com/plaidcrafts 
● Google+: http://plus.google.com/+PlaidOnline

Follow on Bloglovin

I wrote this post as part of a paid campaign with Plaid Crafts and Blueprint Social. The opinions in this post are my own.

Thursday, February 13, 2014

How to Make Decorative Pillows

Jes from Mommy Envy is here today with a quick sewing tutorial. Stay tuned to learn how to make a decorative pillow...these make great gifts throughout the year and are a great way to freshen up your decor after the holidays!
Decorative Pillows

***********************

Hello! My name is Jes and I blog over at Mommy Envy about my home, life and food. My mother-in-law makes beautiful pillows and I've always told her that one day I will have her make pillows for my house. Every time she tells me "no"! She insists that I learn myself. Which is good, I guess, but I didn't think I had the time or talent to whip up something like pillows...with cords! I made 7 pillows in one night (about 3 hours). She kept an eye on me but I made them myself and now you can too with her instructions.          

What you will need:

-Sewing machine and a zipper foot.
-Thread similar in color to the fabric you are working with.
-Fabric of choice (either the same for the pillow and cording or two contrasting fabrics
-16x16 Pillow form
-1/4 inch cording approximately 65 inches. 

Step 1.

Cut your pillow fabric. Figure out the size of your pillow and add 1 inch. I made a 16x16 pillow, so I cut a square that was 17 inches by 17 inches. This is for your ½ inch seam allowance.

Step 2.

If you are using a ¼ inch cording - Cut a 2 inch strip the length will need to be the perimeter of your pillow. Mine is 16x16 so 16 times 4 sides is 64 inches. (but always give yourself a couple more inches to make a nice finish to the cord)

Step 3.

Attach your cording to one side of your pillow (the right side). You will end up putting both squares together with the right side in.

Start with one side with the right side (what you want to show when you’re finished) You will wrap your cord with the strip and have a lip to sew it to the square. You will work your way around attaching it to the entire square.

At each corner, you will need to cut a 45 degree angle and adjust the cord so that you can turn to the next side. Each side will have a ½ inch seam allowance. 
Decorative Pillow Cording 4

Step 4.

Finishing step 3. You will need to make the finish look good because it will be seen. You will cut your cord to match up with your start. You will then cut the strip 1 inch past the end of the cord. You will fold it over and finish sewing. Decorative Pillow Cording 2

Step 5.

Attach the back of your pillow leaving a gap on one side. You will place pretty sides on the inside facing each other.

Starting where you started the cord (so that any endings are at the bottom of the pillow). Keeping the stitch close to the cording (so you don’t see awkward seem gaps), sew around the edge of the pillow until you come to the bottom of the pillow, again leaving a large gap.
Decorative Pillow Cording 3

Step 6.

Insert your pillow form or stuffing.

Step 7.

Iron the seam of your pillow so that it folds over easily. Then sew the final gap closed.

Thank you, Amanda, for letting me hang out here today! I started Mommy Envy for two reasons. One, because I've always wanted to be a writer and I had to finally do something for myself. The second reason is because I think all moms have moments when they feel inadequate and weighed down. I know I do! I sometimes show pictures of my messy house, not that it makes you feel any more adequate than me. My posts try to encourage you to go after your dreams and to hopefully help out with tips in areas you don't want to excel at (like the laundry!).

******************************

Thanks, Jes, for showing us how it's done!

You can catch up with Jes at her blog, Mommy Envy. Be sure to stop by and say "hello!"


If you enjoyed this post or found it helpful, I hope you'll click your "Pin It" button to add this post to Pinterest, or a +1 for Google+. And I always appreciate kind comments.


Follow on Bloglovin

Thursday, January 16, 2014

Snowflake Onesie (Craft and Sewing Tutorial)

Sara from Craft Snob has a fantastic simple sewing tutorial for us. Keep reading to see how she made this adorable Snowflake Onesie! You won't believe how inexpensive this cute idea is!


************************************


It’s getting cold here again. I love it! Since we don’t get snow, I am in the spirit of creating my own snow. My snow is cozy and warm though. See for yourself:


Make a snowflake out of paper to use as a pattern. Start with a square cut out 3 inches by 3 inches. Fold the paper in half two times. Cut it like you see in the picture (unless you want it to look different of course). Open the paper back up. Trace the snowflake pattern on the fleece and cut it out. Make (2) 3 inch flakes and (3) 2 inch flakes.

Arrange the snowflakes on the onesie the way you want. Pin them into place and then sew each one. That’s it!

The real deal: It only costs about $0.30 in materials to add these cute little embellishments.

Tutorial by Sara Lanan. Add her to your g+ circle.

**********************

Thanks, Sara! Love the onesie and the fact that it could easily be adapted for an older child. Great project idea for this winter. Be sure to visit Sara at Craft Snob!

If you enjoyed this post or found it helpful, I hope you'll click your "Pin It" button to add this post to Pinterest, or a +1 for Google+. And I always appreciate kind comments.


Follow on Bloglovin

Tuesday, December 17, 2013

DIY Drop Cloth Ornaments (Christmas Craft)

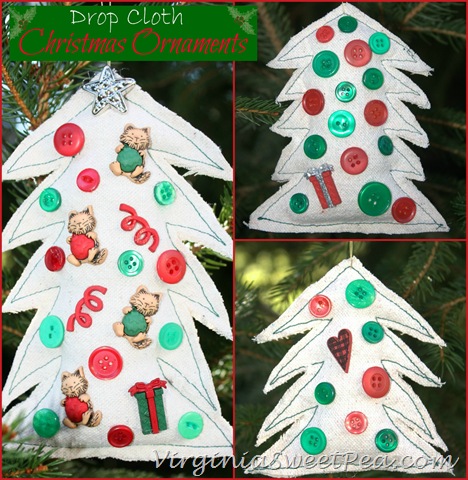
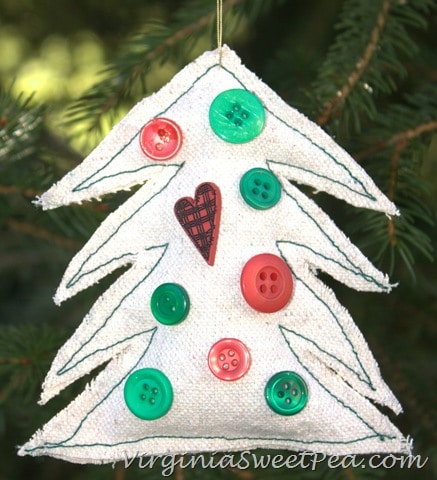
I love handmade ornaments, and our family Christmas tree is a testament to that each year! As part of this month's Christmas series with lots of affordable, simple holiday ideas, Paula from Sweet Pea agreed to swing buy the blog today and share a fun tutorial for Drop Cloth Ornaments! Please help me welcome Paula.
**************************

Hello, Serenity Now readers, I’m Paula from Sweet Pea. I’m a 7th grade teacher by day and in my free time enjoy both blogging and being active. I love to run, bike, play tennis, and go to the gym. When I’m not teaching or sweating, I blog about DIY, crafting, decorating, cooking, gardening, and travel. I’m delighted to be Amanda’s guest today to share a fun Christmas craft:
                                   Drop Cloth OrnamentsDrop Cloth Christmas Ornaments by virginiasweetpea Aren’t these cute? The great things is they are simple to make, too. Let me show you how.

Supplies Needed:

Drop Cloth Scraps
Thread
Needle
Scissors
Sewing Machine
Buttons
Fray Check
Craft Glue
Thin cord for hanging

Procedure:

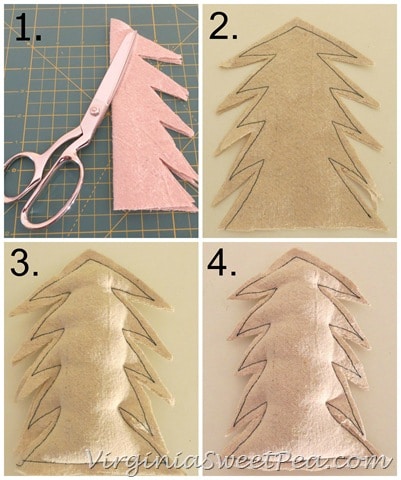
1. Fold a 5”x5” or smaller square of drop cloth in half. Cut limbs with scissors.

2. Stitch around the edge of the tree with contrasting thread with a 1/4” seam allowance leaving the bottom of the tree open.

3. Stuff tree with fiberfill stuffing. Sew the bottom of the tree closed.

4. Trim the edges of the tree so that both sides look uniform. How to Make Drop Cloth Ornament
5. Drop cloth ravels very easily. Run a bead of fray check around all edges and allow to dry.

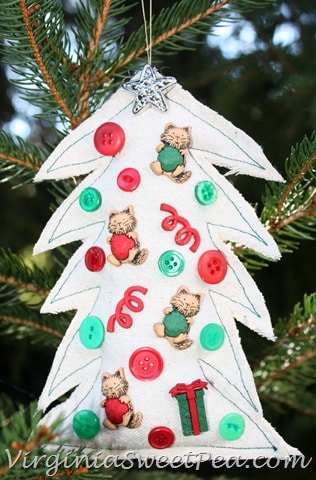
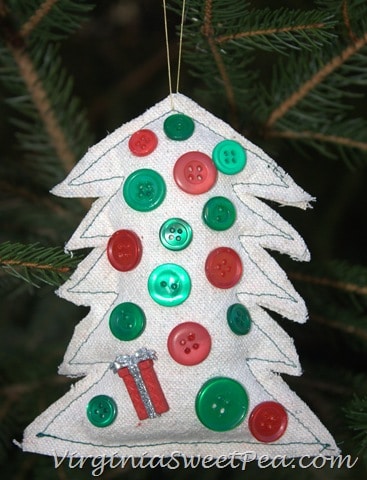
6. Use craft glue to embellish the ornament with decorative buttons. I used Christmas buttons but any type would look nice.

7. Use a needle and thread to add a thin cord hanger to the ornament.

I had so much fun making these and can’t wait to give them to family and friends for Christmas.
Christmas Ornament for Amanda1 Christmas Ornament for Amanda3 Christmas Ornament for Amanda2a     

Many thanks to Amanda for inviting me to visit today. Amanda and I have both been blogging friends since we both began our blogs and hers is a daily must read for me. I’d love it if you would drop by to visit me at Sweet Pea or connect with me on Facebook, Pinterest, Google +, or Twitter. I hope you enjoy each and every day of this wonderful holiday season.

**************************
Love the rustic touch with the drop cloth, Paula! These would be perfect gifts and I know my kiddos would enjoy sorting through buttons to choose for our ornaments. Great idea!

*You'll find more holiday inspiration for this season at my Christmas series, A Season of Serenity, which is running all December long. The posts are rounded up as each one goes live. I'd love for you to visit!*


If you enjoyed this post or found it helpful, I hope you'll click your "Pin It" button to add this post to Pinterest, or a +1 for Google+. And I always appreciate kind comments.


Follow on Bloglovin

Thursday, November 14, 2013

DIY Toddler Superhero Scarf (Sewing Tutorial)

Michele from The Scrap Shoppe is swinging by the blog today with a simple sewing tutorial for us. You can learn how to make your own version of this cutie Toddler Superhero Scarf. Isn't the model adorable? I can't believe I'll be playing superheros, soldiers, and dinosaurs before too long! This would be a great project to tackle if you need some alone crafty time over the Thanksgiving holiday...and what a cute Christmas gift or stocking stuffer.
***********************

Hi guys! I'm excited to be here filling in for Amanda while she prepares for her new bundle of joy. And since #3 is an adorable baby boy, I thought a boy project was in order! I have a fairly simple sewing project for you. 
A toddler superhero scarf!

By the way, I am Michele and I create over in my little corner of the world at The Scrap Shoppe.
I dabble in a little bit of everything... paper crafts, jewelry, home decor - I'm a but eclectic when it comes to crafting! And, you should know, I'm new to the world of sewing. This is my 4th project and I think I'm well on my way to sewing up a storm! I also have two little boys that I love to create for.

Have you ever noticed that its not easy to find scarves for your toddler? Hats, gloves... easy peasy. But scarves seem to be a bit scarce. I decided it was time to remedy that and make some!

I love to peruse the fabric remnants at my local craft stores. Its a great way to get pricey fabrics at bargain basement prices. Lately I've been collecting quite a bit of superhero fabric.  My boys love superheroes!

And this flannel superhero fabric was the perfect thing to make into scarves.

Disclaimer: I know I am mixing the DC and Marvel Comic characters. If you're a comic book guru, please do not hold this against me. My boys are young and to them a superhero is a superhero. We embrace them all! ;)

These are the basic directions I created to make the scarves. I'll walk you through the process in the following pictures, but this has everything all in one place.

After measuring one of my own scarves on my 5 year old, I determined that 38" was a great length for a toddler scarf. The width is negotiable. I chose 6" because of the print on my fabric.
Select the material you want to use for this project. I wanted something that would be warm so I went with flannel. The yellow flannel was leftover from my boys' TMNT Halloween costumes. Using a solid color for the ends of the scarf will make it easier to add and see the monogram we will be adding to it later.

Cut your material: 
1 piece at 33" x 13"
2 pieces at 4" x 13"

Stitch together the 3 pieces of material with the shorter pieces at each end of the long piece allowing for a 1/2" seam. 

Fold the material in half, with the backside of the material facing the outside (wrong side out).
Sew along the long end and top of the scarf with a 1/2" seam. Do not sew closed the bottom of the scarf.

Pull the scarf right side out through the bottom of the scarf. Iron to smooth the edges.

Fold the bottom of the scarf under for a 1/2" seam. Iron smooth.

If you are going to add a monogram to the scarf, now is the time to do it before we close the scarf up.
I made a freezer paper stencil monogram using Paul's Super Font

First, I printed out the letters on cardstock in the appropriate size. Cut those letters out as they will be act as our stencil. On the rough side of the freezer paper trace the stencil. Cut out the stencil keeping the negative pieces. Place the freezer paper smooth-side-down on your scarf and iron on. The freezer paper will seal itself to the material creating a stencil for painting the monogram. 

Place something such as cardboard or extra freezer paper between the top piece of fabric and the bottom and use basic acrylic paint for the monogram. Once the monogram is dry, peel off the freezer paper.
You can also choose to embroider or iron on a letter for the monogram.

Once the paint is dry, apply a 1/4" topstitch around the edges of the scarf. Depending on the size of your monogram, you may stitch over it. If that is the case, use a toothpick or Q-tip to paint the stitches on the monogram.

The scarf is now ready for your little superhero!

My little guy is SUPER excited about his new scarf! And it was such a breeze to put together that I made extra ones for Christmas gifts for the other little guys in my life.

I'm happy that my little guy loves his new scarf so much AND that I can keep him extra warm this winter.
Win-win!
Thanks so much for having me over, Amanda! Enjoy that beautiful little boy!

Y'all come visit me sometime. I would love to have you over!
*****************************

Thanks, Michele! I seriously can't get over his sweet little grin! This scarf would be an awesome handmade gift for a cute little boy in your life.

If you enjoyed this post or found it helpful, I hope you'll click your "Pin It" button to add this post to Pinterest, or a +1 for Google+. And I always appreciate kind comments.

Follow on Bloglovin
Related Posts Plugin for WordPress, Blogger...