Wednesday, December 18, 2013

Free Christmas Printable

I am so pleased to welcome sweet and talented Erin from How to Nest for Less to the blog today for today's latest edition of my Season of Serenity Christmas inspiration series. She has an adorable FREE Christmas printable to show off today. Printables are one of the easiest ways to update your holiday decor in a snap. Check it out...Erin's simple instructions to download and print are below.

                     merry christmas and happy new year

****************************

Hey everyone, it's Erin from How to Nest for Less. I'm thrilled to be filling in for Amanda today and sharing some Christmas cheer! erin how to nest for less

As a graphic designer, one of my favorite ways to decorate around the home is with printables! And I share a bunch on my site for every holiday.

Well today I have a new one just for the readers of Serenity Now!
merry christmas and happy new year

This is designed to be an 8×10 inch printable that you can cheaply frame or Mod Podge to a canvas board like I did for my Vintage Photo Prints or Back to School Boards.

Just right-click on the image above and save to your desktop. Then open, print and frame!
christmas free printable


And, if you're looking for another great holiday print, check out my Christmas Subway Art free printable. This is available to download by clicking here.
                                      christmas subway art free printable

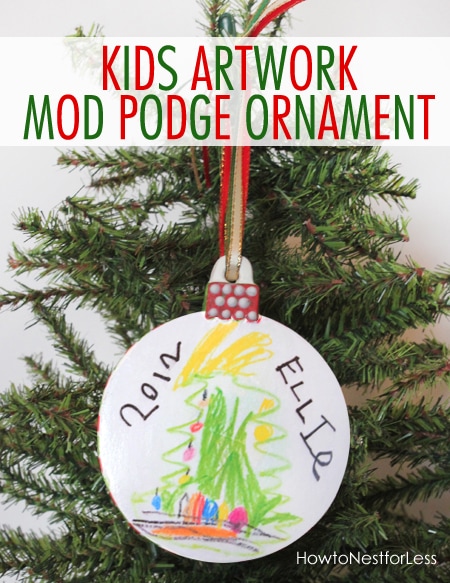
Also check out my tutorial on how to make an ornament from your kid's artwork for less than $5!
                          kids artwork christmas ornament

Thanks, Amanda, for letting me visit for the day and share my new printable. Happy holidays to everyone!

  ******************************

Wanna see how fast I can get to my printer? Seriously cute, Erin! Thanks for taking the time to create something special just for us.

*You'll find more holiday inspiration for this season at my Christmas series, A Season of Serenity, which is running all December long. The posts are rounded up as each one goes live. I'd love for you to visit!*


If you enjoyed this post or found it helpful, I hope you'll click your "Pin It" button to add this post to Pinterest, or a +1 for Google+. And I always appreciate kind comments.


Follow on Bloglovin

Tuesday, December 17, 2013

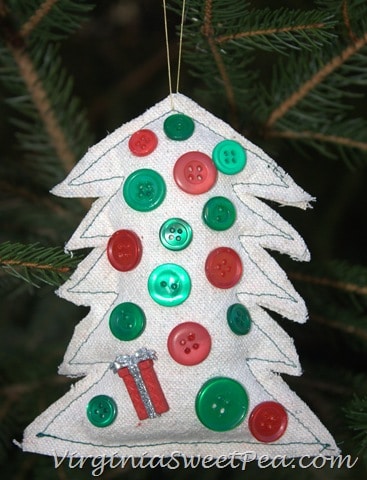
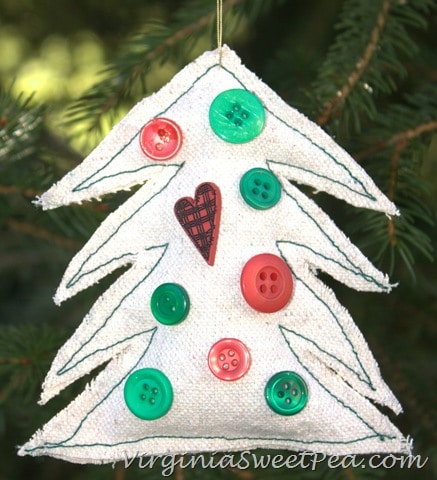
DIY Drop Cloth Ornaments (Christmas Craft)

I love handmade ornaments, and our family Christmas tree is a testament to that each year! As part of this month's Christmas series with lots of affordable, simple holiday ideas, Paula from Sweet Pea agreed to swing buy the blog today and share a fun tutorial for Drop Cloth Ornaments! Please help me welcome Paula.
**************************

Hello, Serenity Now readers, I’m Paula from Sweet Pea. I’m a 7th grade teacher by day and in my free time enjoy both blogging and being active. I love to run, bike, play tennis, and go to the gym. When I’m not teaching or sweating, I blog about DIY, crafting, decorating, cooking, gardening, and travel. I’m delighted to be Amanda’s guest today to share a fun Christmas craft:
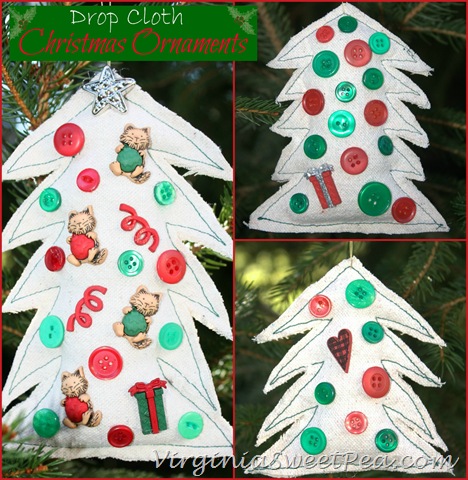
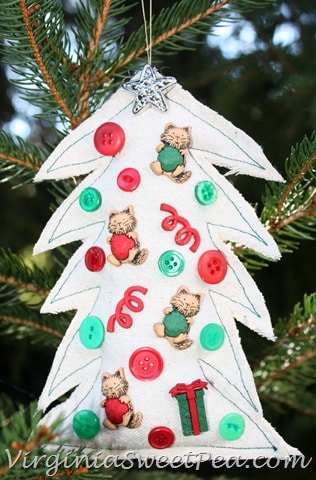
                                   Drop Cloth OrnamentsDrop Cloth Christmas Ornaments by virginiasweetpea Aren’t these cute? The great things is they are simple to make, too. Let me show you how.

Supplies Needed:

Drop Cloth Scraps
Thread
Needle
Scissors
Sewing Machine
Buttons
Fray Check
Craft Glue
Thin cord for hanging

Procedure:

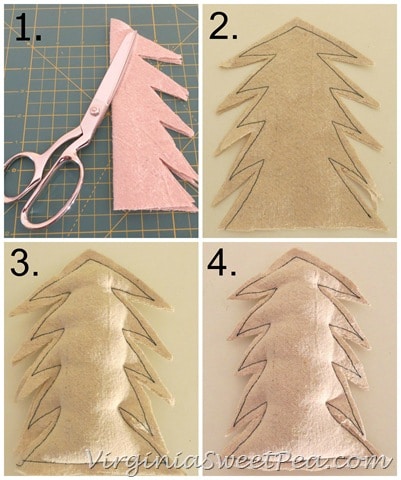
1. Fold a 5”x5” or smaller square of drop cloth in half. Cut limbs with scissors.

2. Stitch around the edge of the tree with contrasting thread with a 1/4” seam allowance leaving the bottom of the tree open.

3. Stuff tree with fiberfill stuffing. Sew the bottom of the tree closed.

4. Trim the edges of the tree so that both sides look uniform. How to Make Drop Cloth Ornament
5. Drop cloth ravels very easily. Run a bead of fray check around all edges and allow to dry.

6. Use craft glue to embellish the ornament with decorative buttons. I used Christmas buttons but any type would look nice.

7. Use a needle and thread to add a thin cord hanger to the ornament.

I had so much fun making these and can’t wait to give them to family and friends for Christmas.
Christmas Ornament for Amanda1 Christmas Ornament for Amanda3 Christmas Ornament for Amanda2a     

Many thanks to Amanda for inviting me to visit today. Amanda and I have both been blogging friends since we both began our blogs and hers is a daily must read for me. I’d love it if you would drop by to visit me at Sweet Pea or connect with me on Facebook, Pinterest, Google +, or Twitter. I hope you enjoy each and every day of this wonderful holiday season.

**************************
Love the rustic touch with the drop cloth, Paula! These would be perfect gifts and I know my kiddos would enjoy sorting through buttons to choose for our ornaments. Great idea!

*You'll find more holiday inspiration for this season at my Christmas series, A Season of Serenity, which is running all December long. The posts are rounded up as each one goes live. I'd love for you to visit!*


If you enjoyed this post or found it helpful, I hope you'll click your "Pin It" button to add this post to Pinterest, or a +1 for Google+. And I always appreciate kind comments.


Follow on Bloglovin

Monday, December 16, 2013

Inspiring Project Ideas {link party features}

Happy Monday! I want to share some Features today from the weekend link party. I love starting the week off with a little creative inspiration.

Here are some projects that caught my eye:

~Holiday Home Tour via Elegant Nest


~Hot Cocoa Station via Satori Design for Living


~Simple and Stylish Gift Wrap Ideas via Two Live Colorfully

Sunday, December 15, 2013

Showcase Your Best Post of the Week --Link Up!

Good morning! I hope your weekend has been pleasant. Just wanted to remind you that there is one more day to link up to this week's Weekend Bloggy Reading link party. It was live on Friday, so feel free to hop on over; I'd love to see you there!

If you haven't joined the fun yet, please hop over to the party and add your best post of the week. We have Home Decor, Crafts, DIY, Recipes, Tips and Tricks, Party Ideas, and so much more! Lots of fun ideas to Pin and tuck away for future use.

If you've already linked up, be sure to browse some of the other projects. If you haven't added a link back to me within your post, please take a minute to do that if you'd like your project considered for a feature. It's good for both of our SEO, guys!

Hope you've had a fantastic weekend.


Follow on Bloglovin

Friday, December 13, 2013

Weekend Bloggy Reading :: Link Up!

Happy Friday! Welcome to my Weekend Bloggy Reading link party. This is the day of the week where other bloggers stop by to link up their best post of the week, and readers get to browse tons of fun project ideas. If you're new here, don't forget to "Follow" or subscribe so you don't miss future parties and projects!

*Please be sure to read my guidelines before you add a link--I've had to bypass so many great projects lately because they didn't include a link back to my blog in the post!

This party is a great place to showcase your very best post of the week (home decor, crafts, party ideas, recipes, DIY, tips and tricks, etc.) and to see what else is out there. I'm currently on "maternity leave" to enjoy our brand new baby boy, so this party is all about you guys! I will be doing my best to keep up with weekly features until I am "back in the game."

Feel free to click over and see what's new with my Season of Serenity at Home Christmas inspiration series after you've linked up!


Time to link up your best post of the week!

Thursday, December 12, 2013

Meet Harris {Birth Story and Updates}

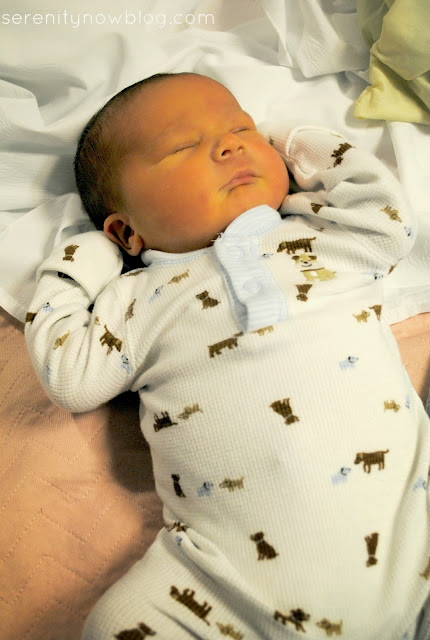
Instead of showing you our minimal Christmas decor (I just haven't been up to it this year), I thought I'd share a few baby pics and give you expecting mamas a realistic look at what a c-section and recovery entails. Wow, what a wild ride. Amnios, ultrasounds, rescheduled surgery. It was all worth it when I met him though. Can I introduce you to our new arrival?

Meet Harris James.
C-section Birth Story, from Serenity Now


He was born via c-section here at our local hospital on Monday, December 2nd, weighed in at 8 pounds 8 ounces (not bad for a 38-weeker!), and was 19 inches long.

Because I try to be as honest as possible when I share here on the blog, I'll share some details about his birth and our recovery. Guy readers might just want to skim for cute baby pics and skip the text. {wink} Hopefully some expectant mama somewhere will read this and find a helpful hint or two!

After a quick trip with my sis, niece, and the girls to see Frozen on Sunday morning, I spent the rest of the day frantically doing laundry, trying to decorate the tree, clean, prep for Natalie's upcoming birthday party, and just generally freak out. It was not my finest moment. I chalk it up to some serious nesting hormones. Must. bake. Must. clean. windows. 

The girls spent the night with T's mom and dad, and we arrived at the hospital bright and early at 5:30 am. I had preregistered online (do this if your hospital allows it--save yourself some time!), so the nurses ushered us right into a triage room. 

The indignities of childbirth began when I had to strip and don one of those adorably fashionable hospital gowns that flashes your hind parts to the entire world. Luckily, I had some cute slipper socks to complete the look. The nurses hooked me up to a monitor to check the baby's heart rate and watch my contractions (I was actually having a few). They also took blood for pre-surgery labs and started an IV.
C-section Birth Story, from Serenity Now


When they were ready to take me back, T got to dress up in a very fancy scrub jumpsuit, which I will admit he brought home...not sure why.
C-section Birth Story, from Serenity Now


Lee, the nurse anesthetist who did my spinal, was absolutely wonderful! He was friendly without being creepy, he made me feel as comfortable as possible, and he didn't make me feel embarrassed when I started throwing up while lying down on the table. Yep, c-section rookies, that can happen. I usually have a pretty strong reaction to the meds and trauma of surgery and throw up for hours afterwards. But it's never happened on the actual table before. But Lee was great...he also distracted me while they were sewing me up later, telling me all about his wife and showing me pics of his dog. It was the perfect thing to do!
C-section Birth Story, from Serenity Now


Harris himself greeted the world with loud shrieks as the doc pulled him out. T was so excited, he was positively giddy. While the baby howled and wailed, the nurses ran the Apgar tests and checked him out. They gave us more time for pictures and holding the baby than I remember with the girls.
C-section Birth Story, from Serenity Now


T and Harris headed off to the recovering room to rest and wait for me. I was awake for most of the time. The recovery nurse placed special compression things on my legs that squeezed every few minutes to keep the blood from clotting. I was able to eat an ice chip or two every few minutes and chat with T. The girls arrived later to meet their brother and they were so excited.
C-section Birth Story, from Serenity Now


The rest of my time in the hospital was a bit of a blur between pumping, trying to feed the baby, trying to sleep, and having irrational hormonal jags of crying. Our hospital has a newer policy of having the babies "room in" with the mom, save for the little ones who need time in the NICU. I personally didn't enjoy this experience, especially the first night. It was tough to get out of bed to change and feed the baby, as they don't typically remove a c-section patient's foley that first night. By the last night, my nurse saw I was in a good deal of pain and just completely exhausted. She took Harris to the nursery for me, and I had several hours break to sleep, pump, and get my hourly checks from the vitals people without having to worry about the baby.
C-section Birth Story, from Serenity Now


We were discharged on Thursday and headed home to recuperate. In between some pretty uncomfortable digestive side effects from my pain meds and the general pain that accompanies major surgery, we had to take Harris into the ER early Saturday morning when he choked after spitting up. We were afraid he may have aspirated it, so we loaded all three kids into the minivan and headed to the ER. We spent several hours waiting on an x-ray, got an "all clear," and arrived home in time for me to pump, feed the baby, and get ready for Natalie's birthday party, which started at 10 am. Yes, a long, long weekend.
C-section Birth Story, from Serenity Now

T returns to work today, but has been a lifeline for me this past week. He ran errands, did dishes, took kids to school and dance, put them to bed, helped me feed the baby, cleaned out the laundry room (!), and made sure I had a chance to rest. Recovery hasn't been quite as easy this time...I chalk it up to the unexpected pain issues that popped up. Plus the fact that I have two other children to care for.

I'm wiped out by mid-afternoon lately. It's hard work to use a breast pump all day, feed the baby, keep bottles and pump parts clean...along with everything else. I've never been so grateful for the wonderful bloggers who have stepped up to share here over the next month or so. I know I can't do it all!

I'm so excited to be a mom of a boy! Harris is a blessing to us already. Thanks for letting me introduce you today!

C-section Birth Story, from Serenity Now


If you enjoyed this post or found it helpful, I hope you'll click your "Pin It" button to add this post to Pinterest, or a +1 for Google+. And I always appreciate kind comments.


Follow on Bloglovin

Wednesday, December 11, 2013

DIY Glitter Flats (Holiday Style)

Hello there! I hope you are enjoying this year's holiday inspiration series as I spend time with my family during this season (and my "maternity leave.") Today, we're welcoming the lovely Michaela Noelle back! I love her style; she is as beautiful inside as she is on the outside. Her tutorial for DIY Glitter Flats will have you running for your craft supplies! You'll be the envy of everyone at the next holiday gathering.


*****************************

Hello Serenity Now readers! I'm so thrilled to be here as apart of Amanda's holiday series. I'm Michaela, an interior designer, event stylist and DIY lover. While she's off spending precious time with her new baby and family for the holidays, I'm here showing you one way to save some moolah this season. 

Want to make some cute shoes for under $30?! Of course you do :) Here's the scoop...


When I used to live in Los Angeles, I took a trip to Rodeo Drive one afternoon. I quickly realized this wasn't the place for me to be shopping, as the most affordable store on the block was Juicy Couture.  We happened into Jimmy Choo, because, well, I'm obsessed with shoes, and I found this pair of black flats with glitter at the toe.  

Immediately, I knew I could recreate this pair of shoes for hundreds of dollars less. The next day I went to Target to buy a pair of simple black flats {$9.99} and Paper Source to pick up my spray adhesive and glitter {$9.99 & $3.75}.  Here's what you need and how to make your own:

Materials: flats, chunky glitter, super spray adhesive, blue tape, plastic bags {to cover the rest of the shoe when spraying the adhesive}.

Step One: Tape off the toe. Cover the rest of the shoe in a plastic bag so it doesn't get sticky.

Step Two: Spray a thick layer of spray adhesive on the tip of the shoe.

Step Three: Spread a heavy layer of glitter across the toe of the shoe on top of the adhesive. 

Step Four: Dump off the remaining glitter.  I used my fingers to gently rub over the tip of the shoe in order to get even more of the glitter off.  

shirt: J. Crew (no longer available) // pants: J. Crew // shoes: Target  

I have to say, I adore the look of my new shoes!  

Word to the wise-- wear them out a few times to get some of the excess glitter off before wearing them to people's homes and such :)  

What do you think? Is this a DIY you can do? While I love me some Jimmy Choo, I also love me a pair of shoes that is a fraction of the price. 

Hopefully this is a look you can recreate for holiday fashion!

Thanks for having me, Amanda!
xoxo
Photobucket

**************************

Pretty fabulous, huh? You all know I love glittery, shiny things, so these are right up my alley. Thank you so much, Michaela, for showing us this awesome project today!

*You'll find more holiday inspiration for this season at my Christmas series, A Season of Serenity, which is running all December long. The posts are rounded up as each one goes live. I'd love for you to visit!*


If you enjoyed this post or found it helpful, I hope you'll click your "Pin It" button to add this post to Pinterest, or a +1 for Google+. And I always appreciate kind comments.


Follow on Bloglovin
Related Posts Plugin for WordPress, Blogger...